

Dear Friends,
This post is intended for friends at Dash  . Both ThreeFold and Dash share common values and there is an enormous potential that can be exploited together, especially when it comes to leveraging ThreeFold’s peer to peer cloud network .
We will quickly demonstrate how to setup a Dash node on the ThreeFold Grid . The purpose here is to get people started. The configuration can be tweaked to perfection with other experts in the community.
Most of the deployments have a common pattern and just require a change in the underlying flist and inputs. The rest of the process for all deployments is more or less the same.
What we will do ?
- Setup your 3bot and install the 3sdk
- Log in and create your Network
- Get your wallet loaded , don’t worry, we have FreeTFTs
- Deploy your Dash container
- Access your Dash container
- Verify your Dash deployment
Before you start, we have 2 networks publicly available
- Mainnet @ https://explorer.grid.tf
- Testnet @ https://explorer.testnet.grid.tf
Our Recommendation : *Start deploying on testnet as ThreeFold gives free nodes to deploy and play around with. Mainnet is production and paid for. Therefore, from settings in the 3sdk menu, switch to TESTNET *
Step 1 - Setup the 3sdk
The 3sdk is a tool that allows you to setup your 3bot and give you access to the ThreeFold Grid for your deployments (containers, virtual machines, S3 storage and so on). The wiki provides detailed instructions on how to set up the 3sdk .
If this part is done, rest should be extremely easy as management is done via web interface.
To access the 3sdk admin interface, in your browser use the following link,
http://YOUR_IP_HERE:7000 or https://YOUR_IP_HERE:4000
7000 is the http port and 4000 is the https port
If you installed locally on your machine, you can use http://localhost:7000
Step 2 - Log in and Create your Network for Deployment
From the previous step, http://YOUR_IP_HERE:7000
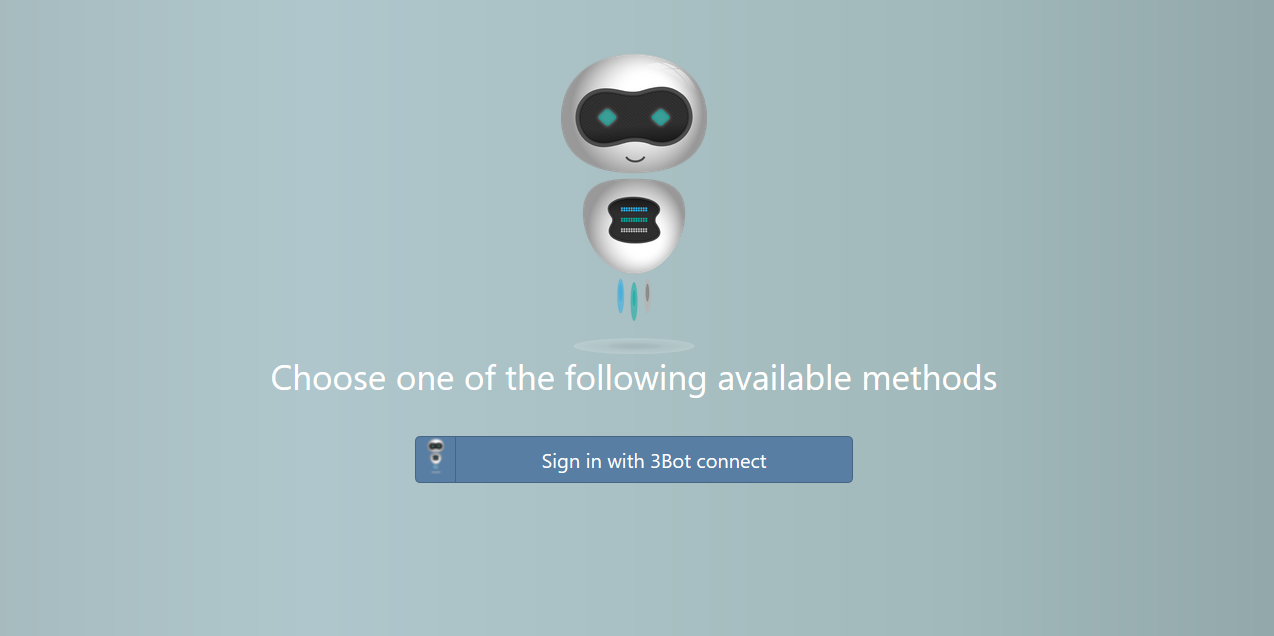
Log in here with your 3bot. Make sure you open the 3bot connect app first!
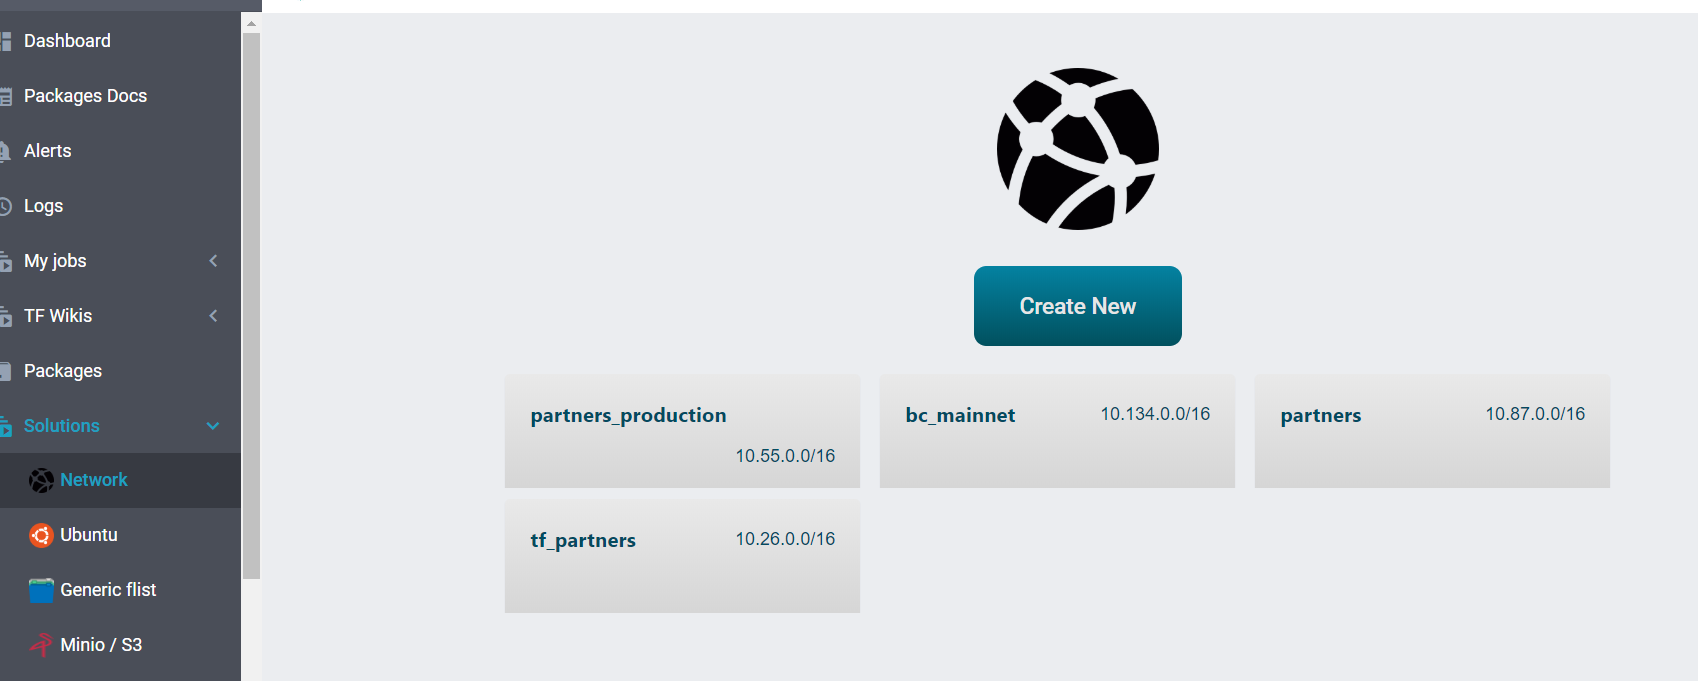
Once you log in, Go to Solutions and then go to Network . The interface is user-friendly and it should be easy. Few things to note,
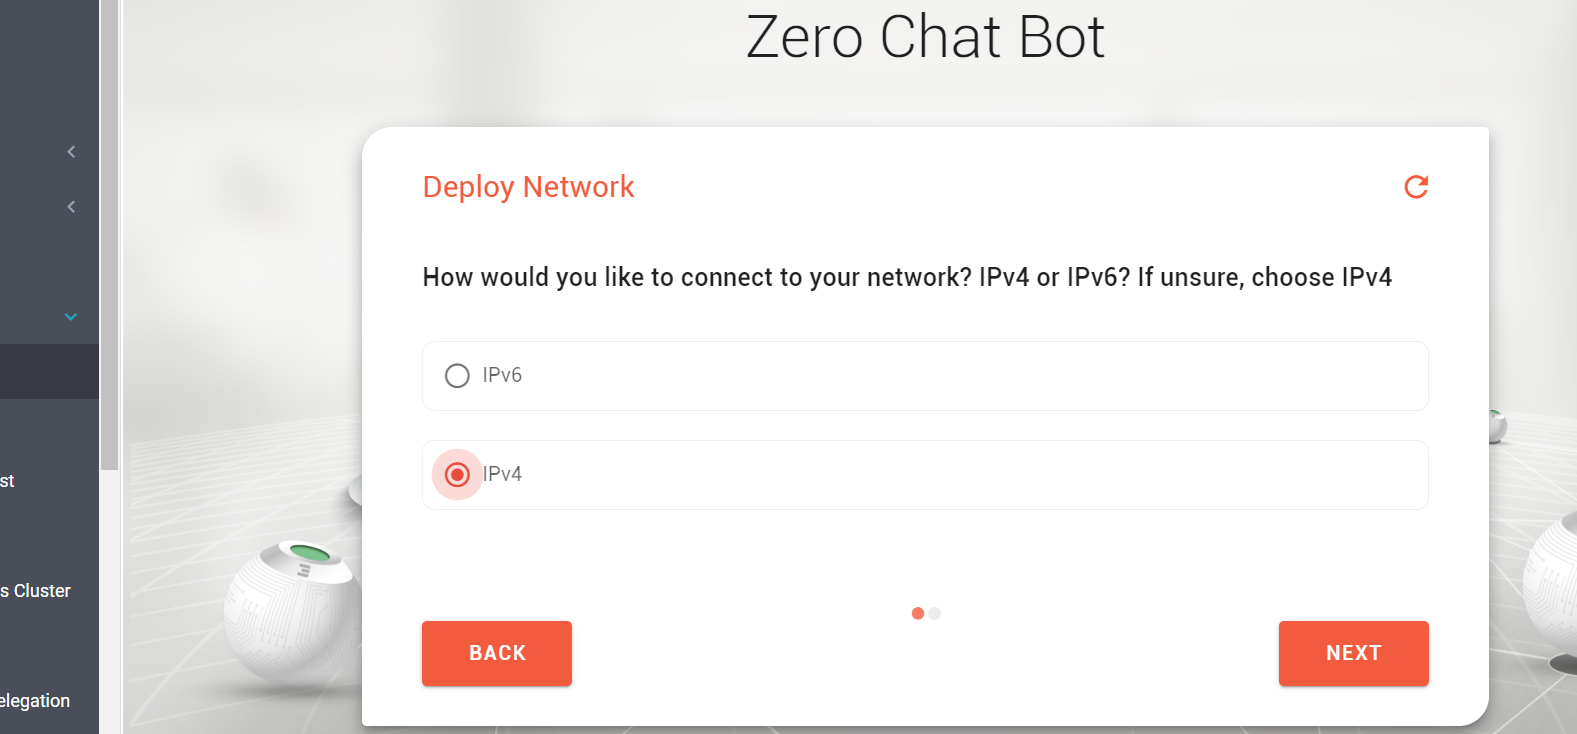
- Use IPv4 network unless you are sure you have IPv6. You can test IPv6 connectivity here
- It is better to have the chat bot configure the network for you unless you have specific requirements
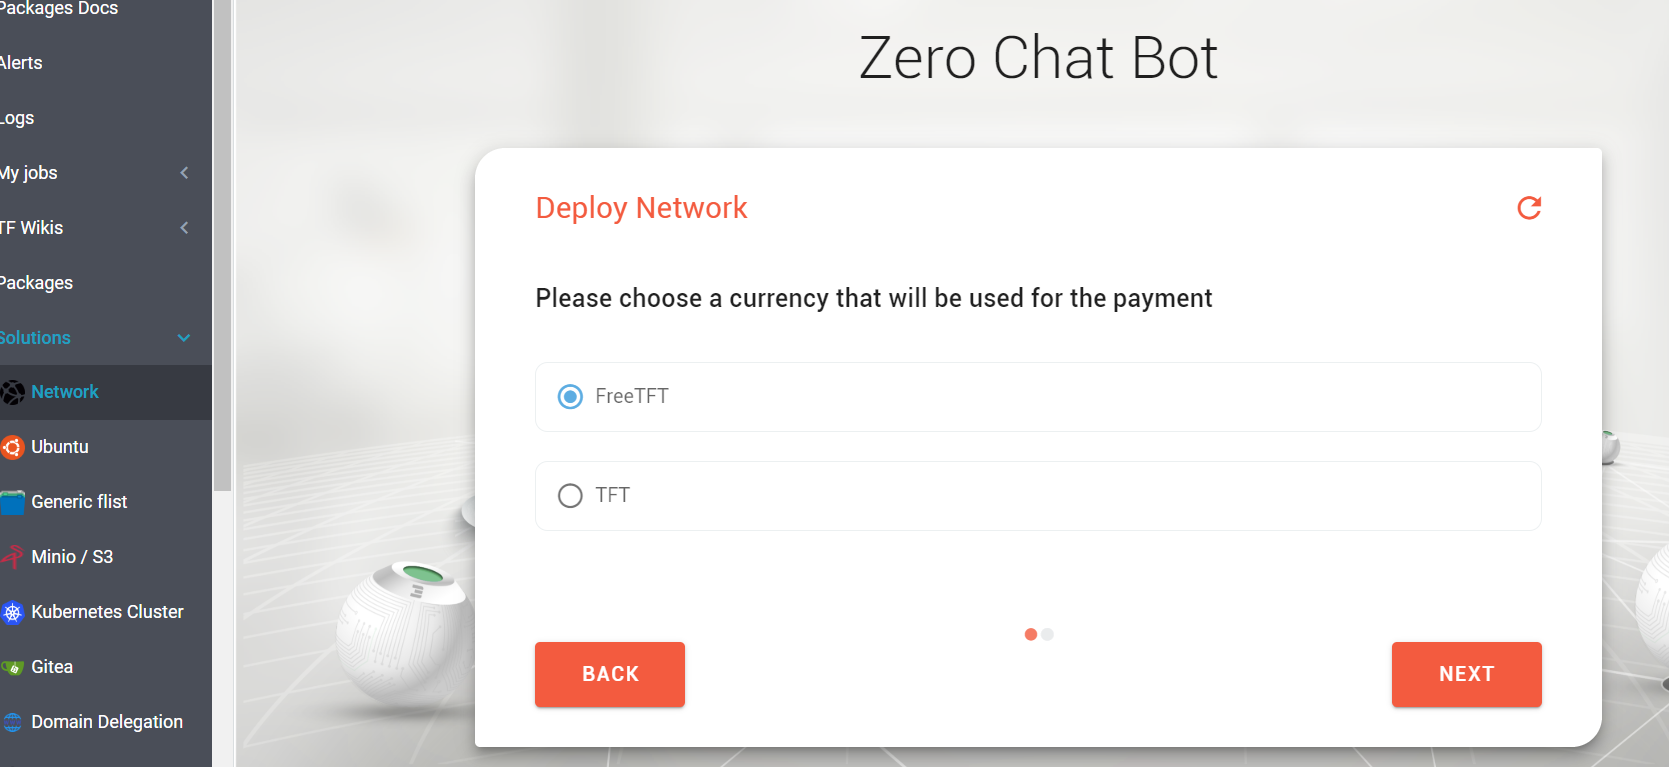
- Ideally start with FreeTFT as your network currency
Now setup the Expiration time
Note : Resources on the ThreeFold Grid are provisioned under a Smart IT Contract. So they will decommission after the expiration. Set the Network to 1 or 3 months or more as you may using it every time you do a deployment.

You can have IPv6 too, but make sure you have IPv6 first. You can test here
Better to have an auto-configured IP range unless you have specific network requirements,
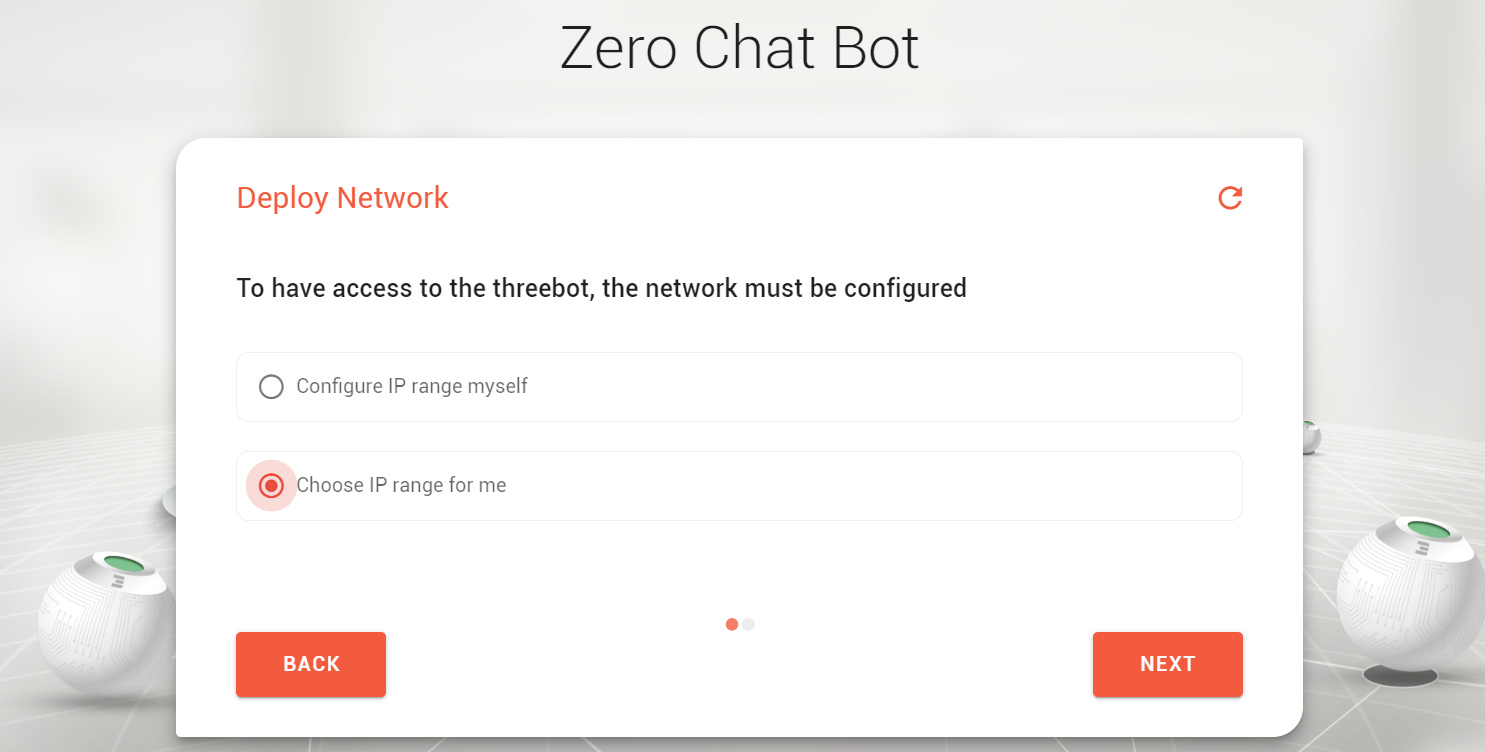
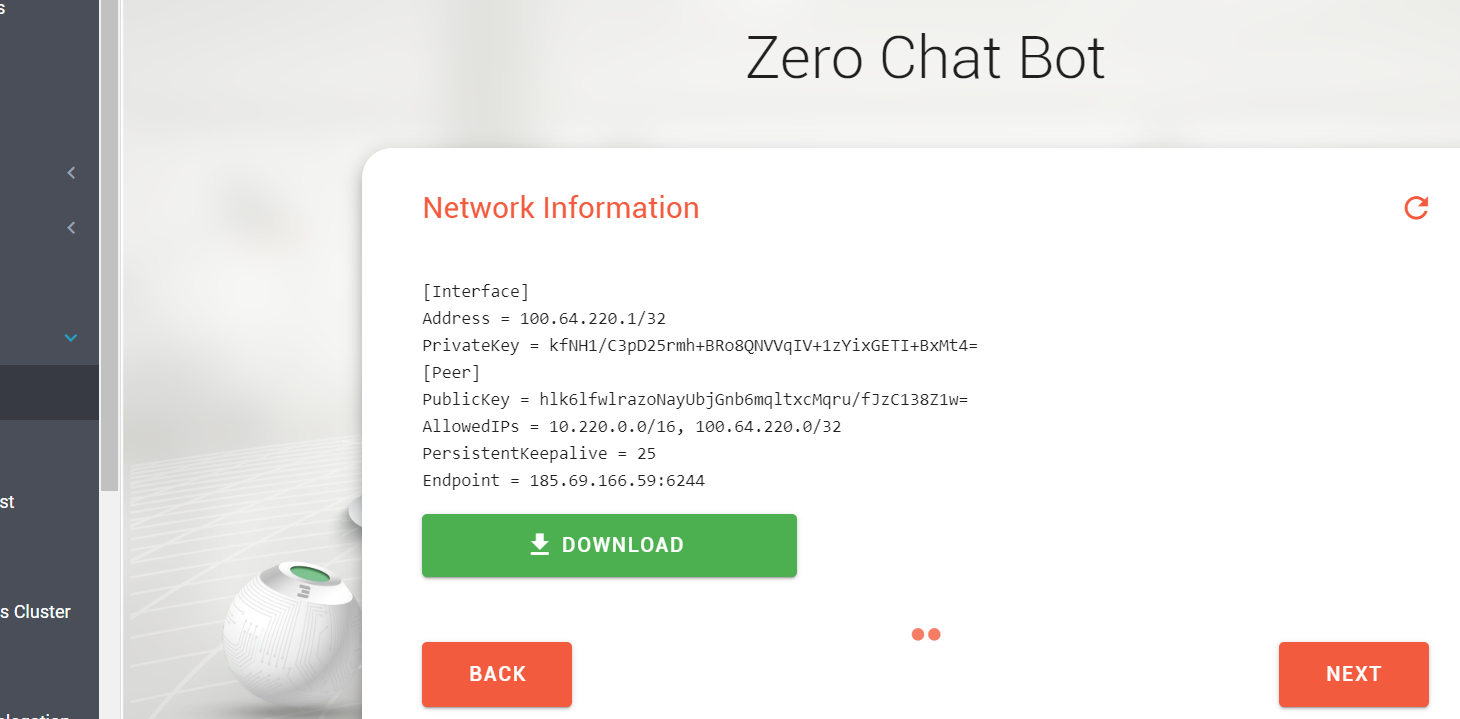
Note : The wizard will ask you to download your Wireguard configuration. This is important as you won’t be able to access your network without it. This serves as an entry point to your private network.
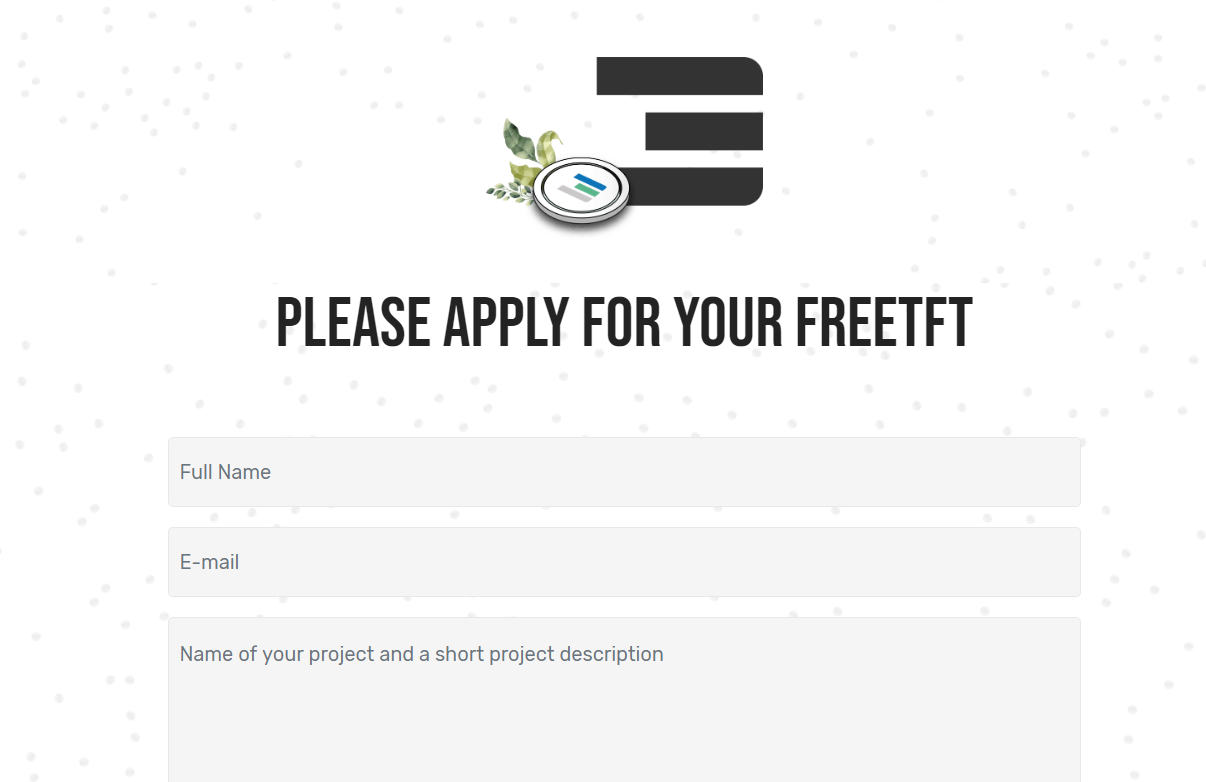
Step 3 : Get your wallet loaded - Get some FreeTFTs
First things first, create a wallet from the Wallet Manager. It is pretty easy actually,
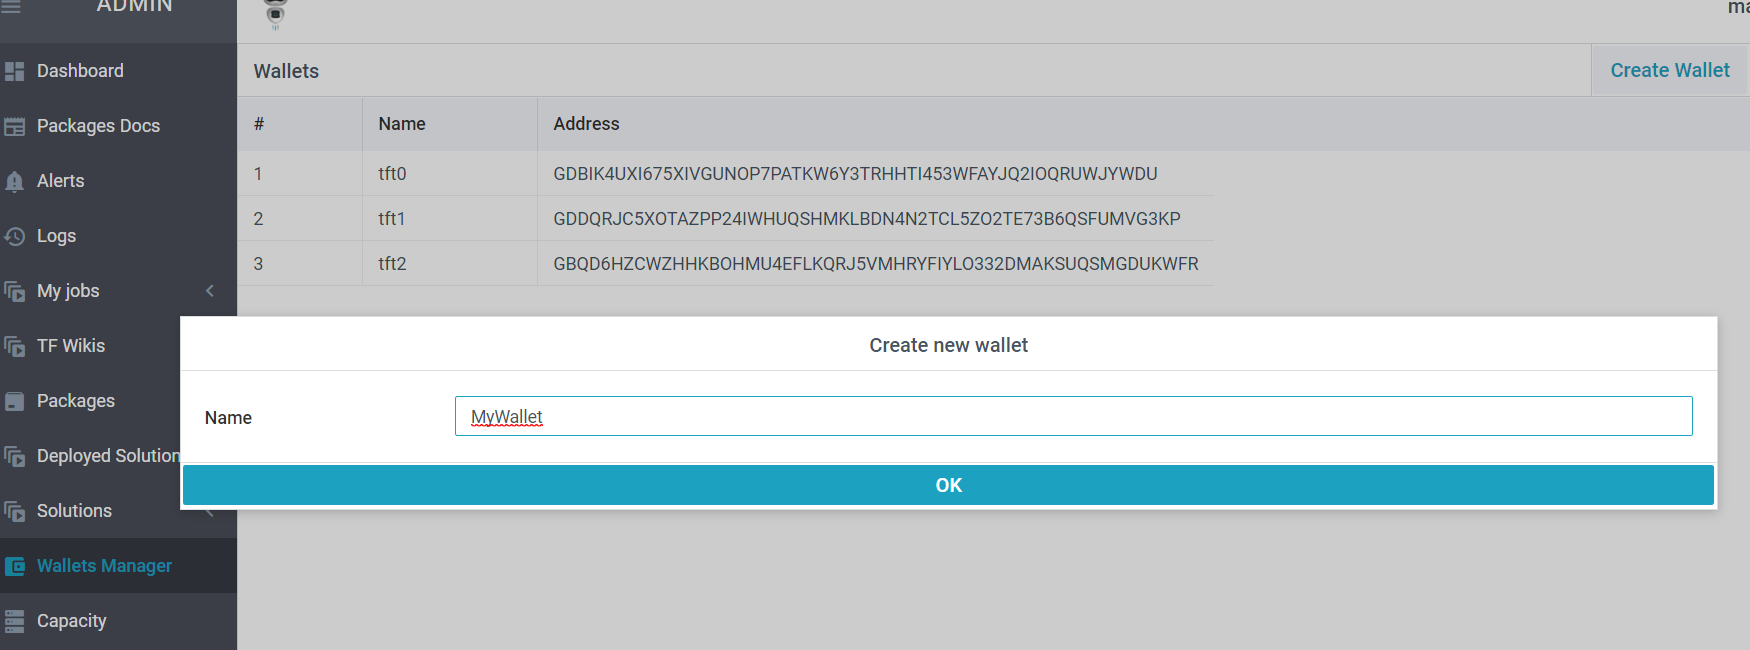
The next step is to get your wallet funded, there are 2 ways,
To get FreeTFTs for testnet, use this link => https://getfreetft.testnet.threefold.io
Login with your 3botID which you created in the 1st step and provide the wallet address. You get 1000 FreeTFTs per wallet. This should be adequate ! The stellar address is the simply the wallet address. Our transaction layer is on stellar.
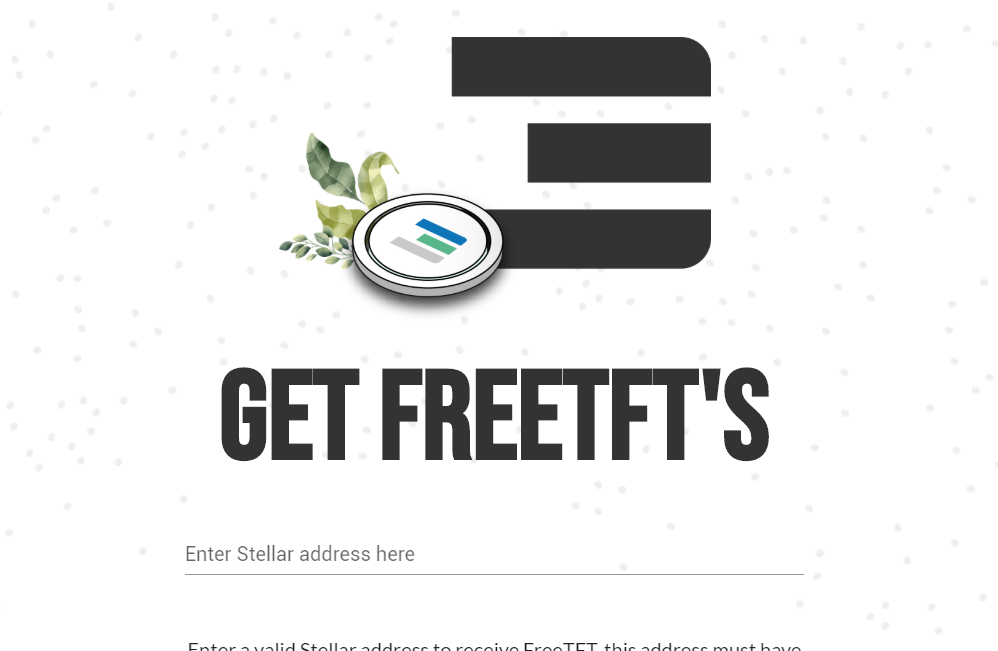
To get FreeTFTs for Mainnet, use this request form => https://www.getfreetft.threefold.io
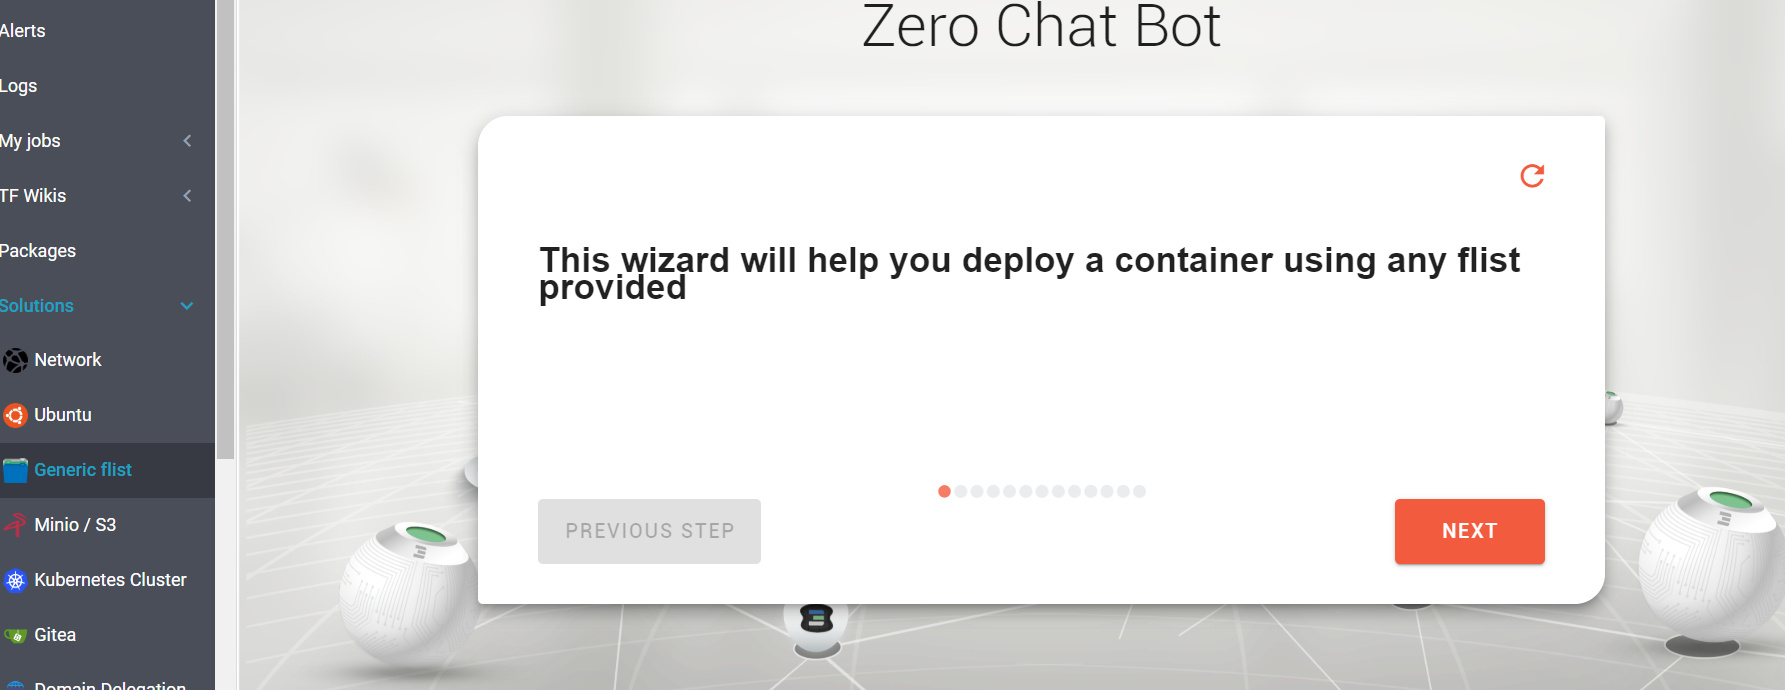
Step 4 - Create your Dash Container - It is show time 
Under Solutions , go to Generic flists , the wizard will guide you accordingly.
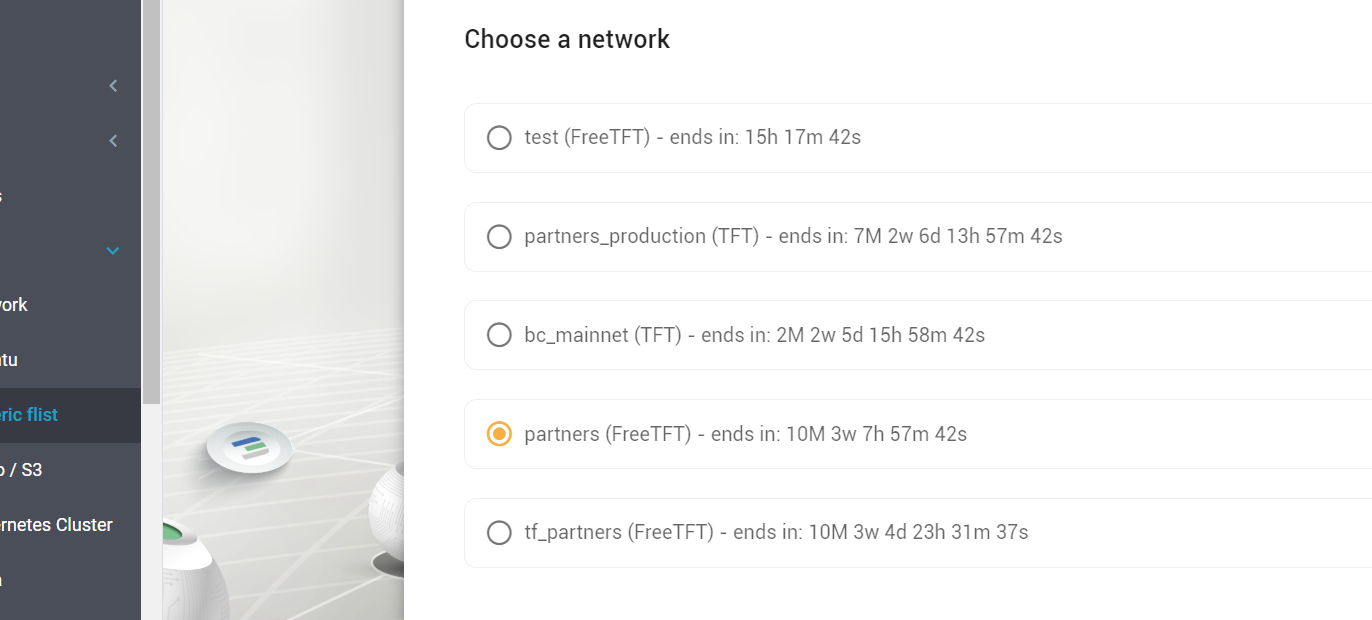
- Select the network name which you created . Your container is going to be deployed in this network.
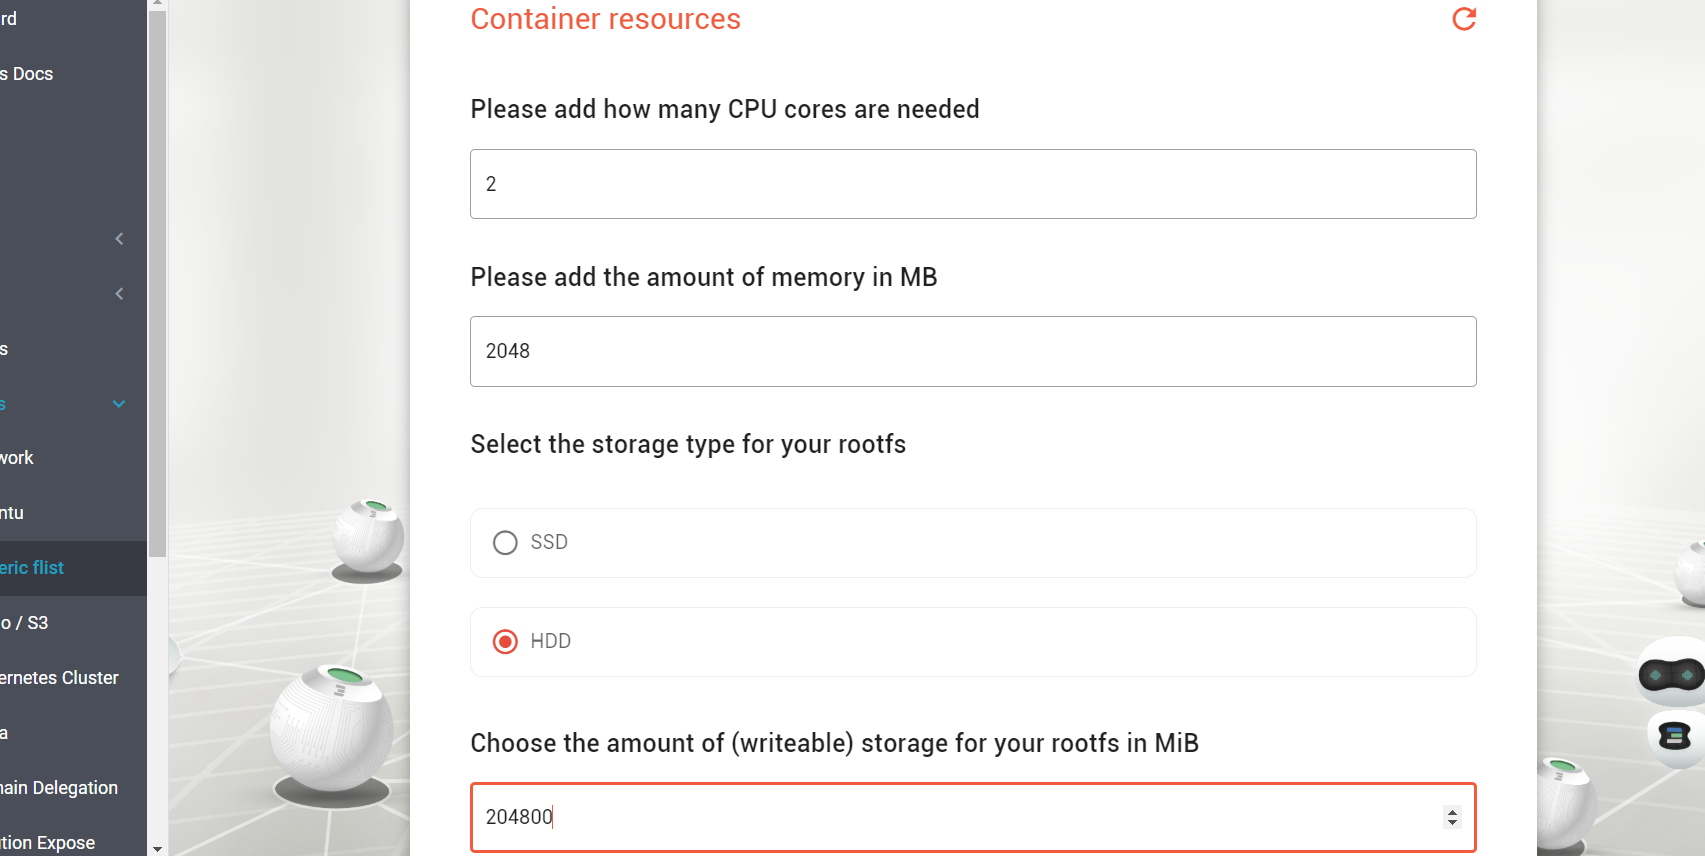
- Enter the container name, size in terms of CPU and memory . Ideally start with 2 CPUs and 2048 MB memory. You can specify the size of the boot disk / rootfs to whatever appropriate. We recommend 200 GB for Dash.
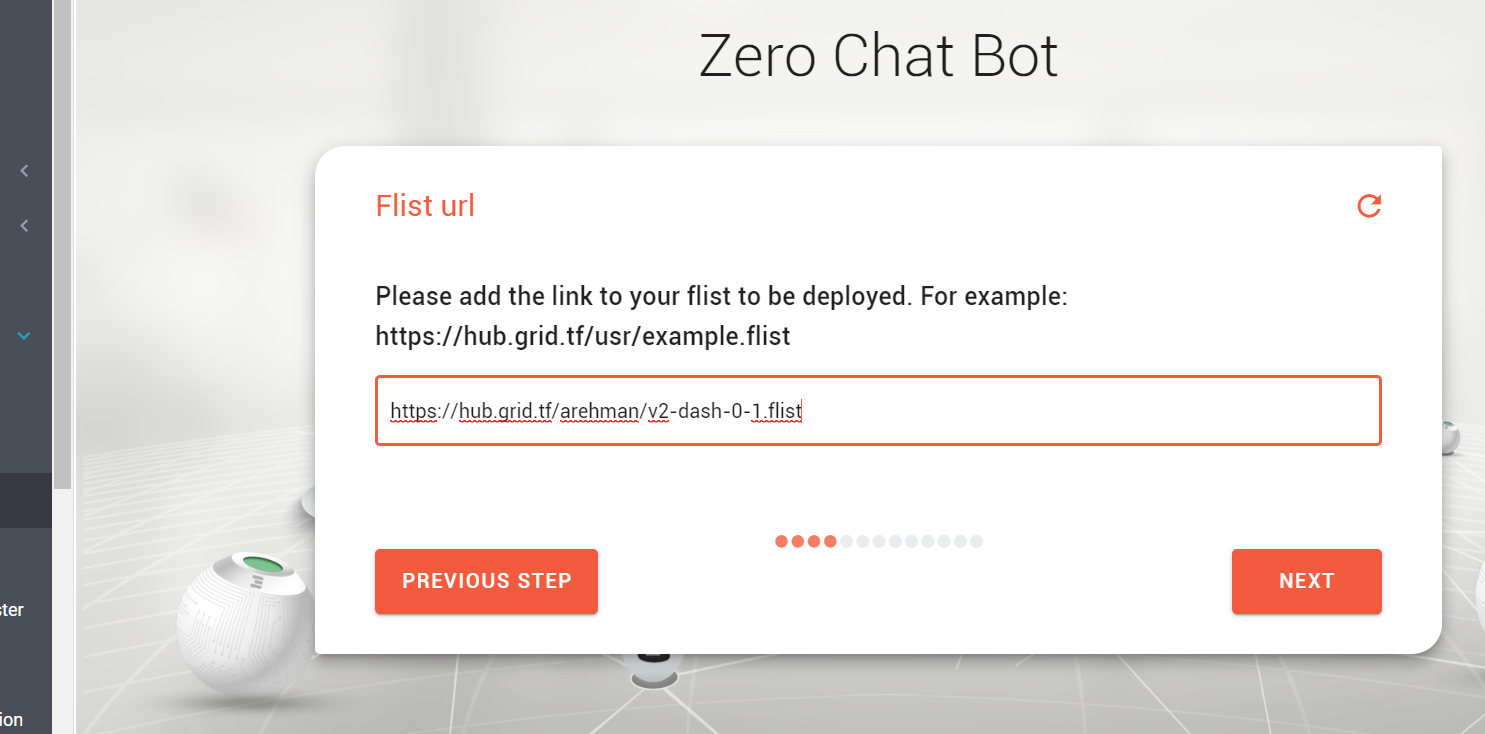
- The flist link you have to use is => https://hub.grid.tf/arehman/v2-dash-1-1.flist
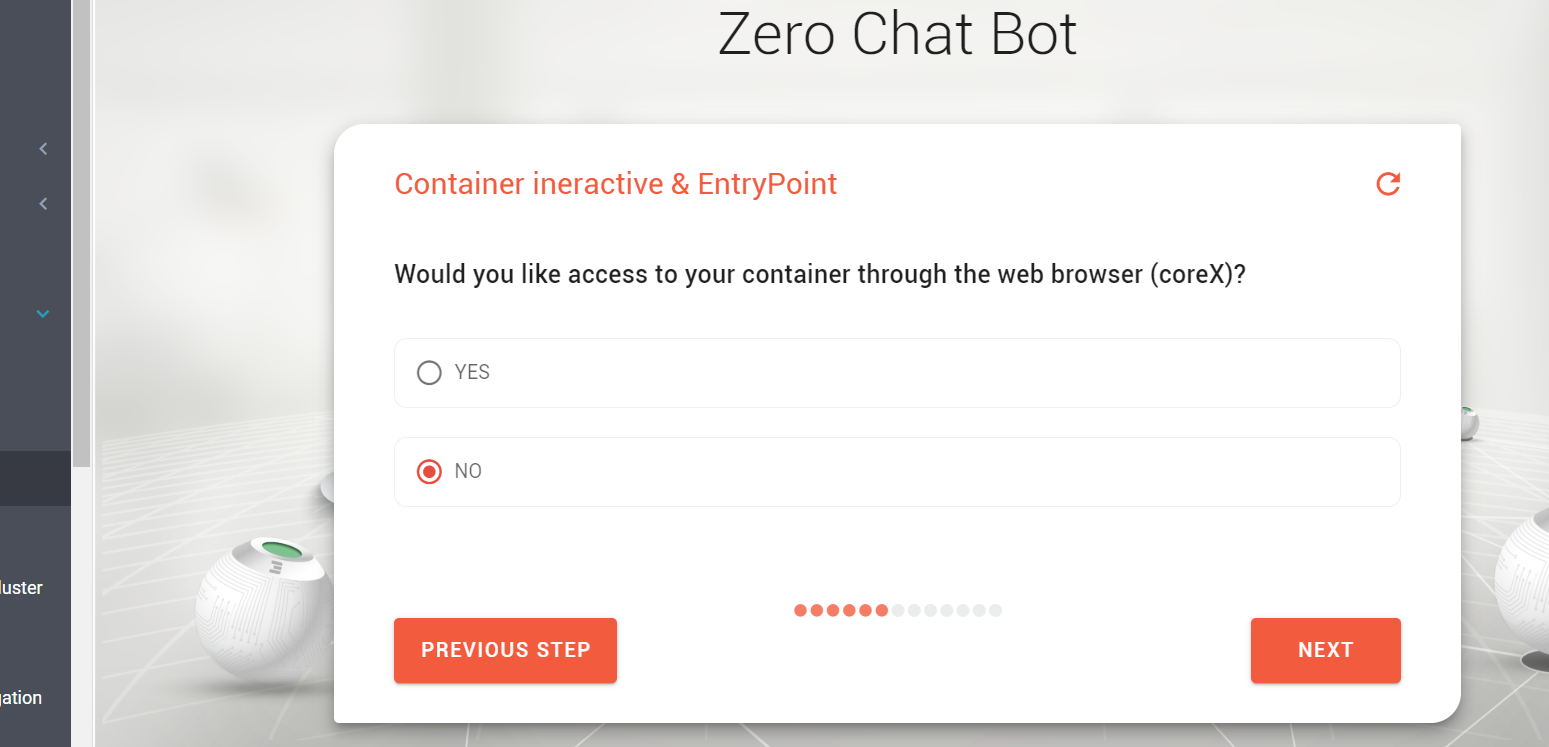
- Would you like access to your container through the web browser (coreX)? Select NO . You may want to use this for troubleshooting.
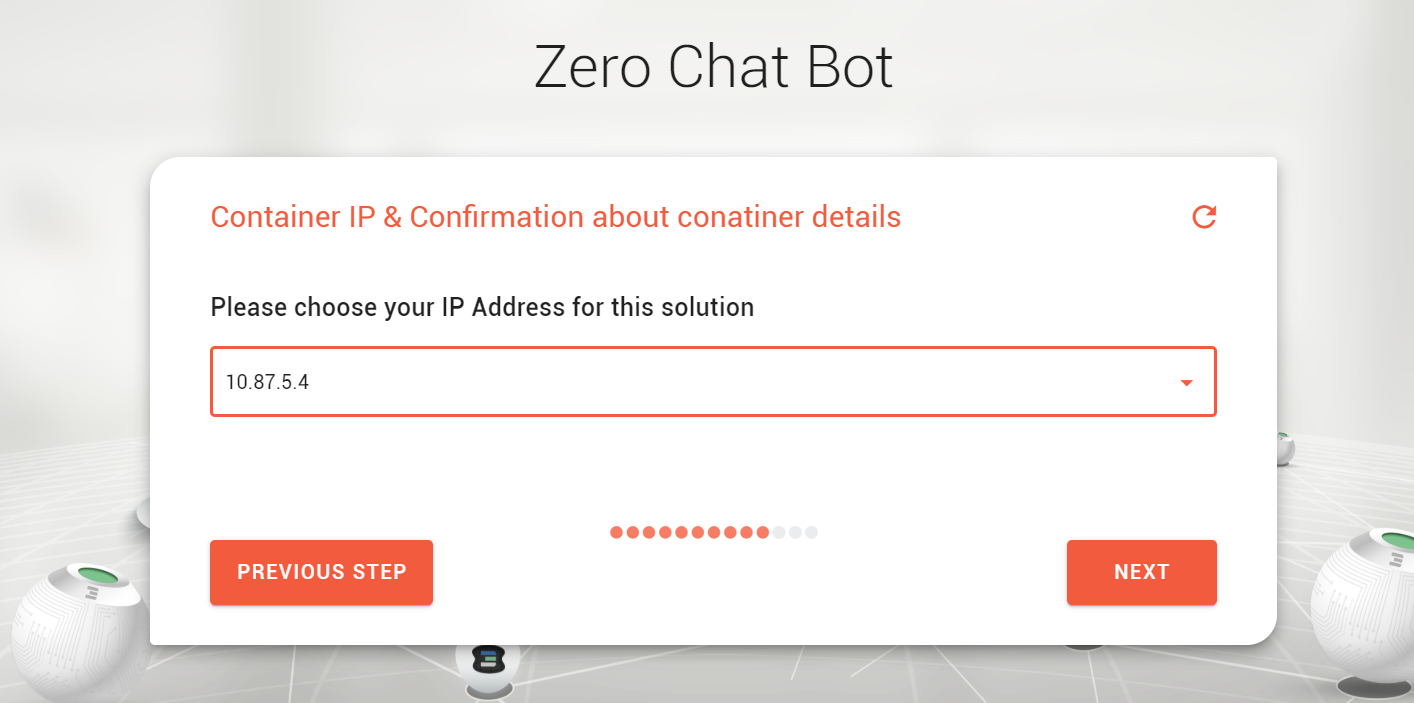
- Set the IP address from the drop down list you want to assign to your container.
- The container entry_point should be set to
/start_dash.sh. - Under environment variables , use pub_key=your_public_key_here . Specify an ed25519 SSH public key . This would allow to SSH into the container once it is deployed.
Choosing from the list of your available networks (Select the one you created above)
After the Name, setup the flist as below. By the way, you can create flists out of your own docker images.
The container resources are a matter of choice, but it would good to start with below. The boottdisk / rootfs is user defined.
Note : Moving forward, we will have the ability to attach persistent data volumes from the chat flows. We can still add them but via code.
You can set this to NO.
Setup your entry point to the container as below => /start_dash.sh
What is the entry point ? In simple words, it is the first user defined script that the container will call once it starts ~
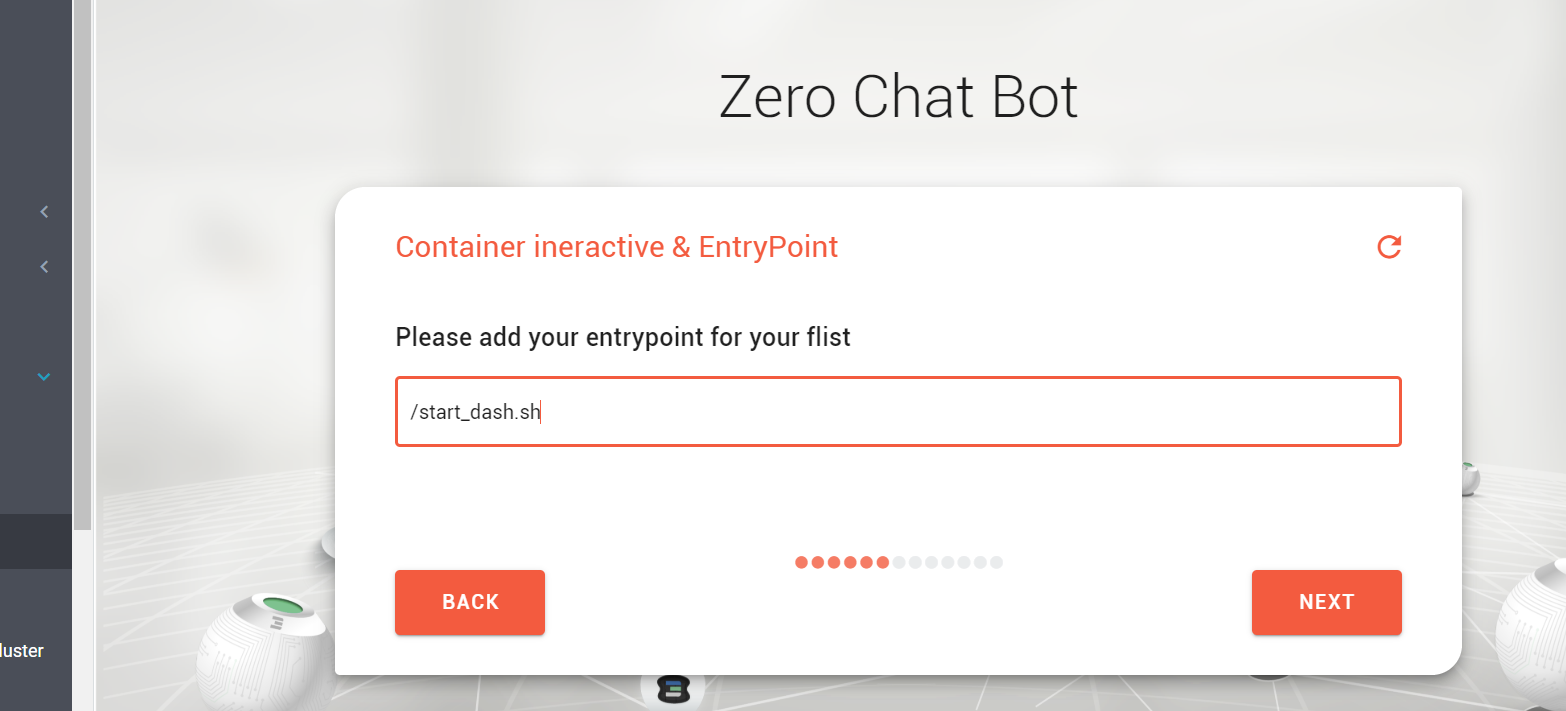
You can pass your ssh public key to gain access. You can also add more variables to control your application logic once you create your own images / flists.

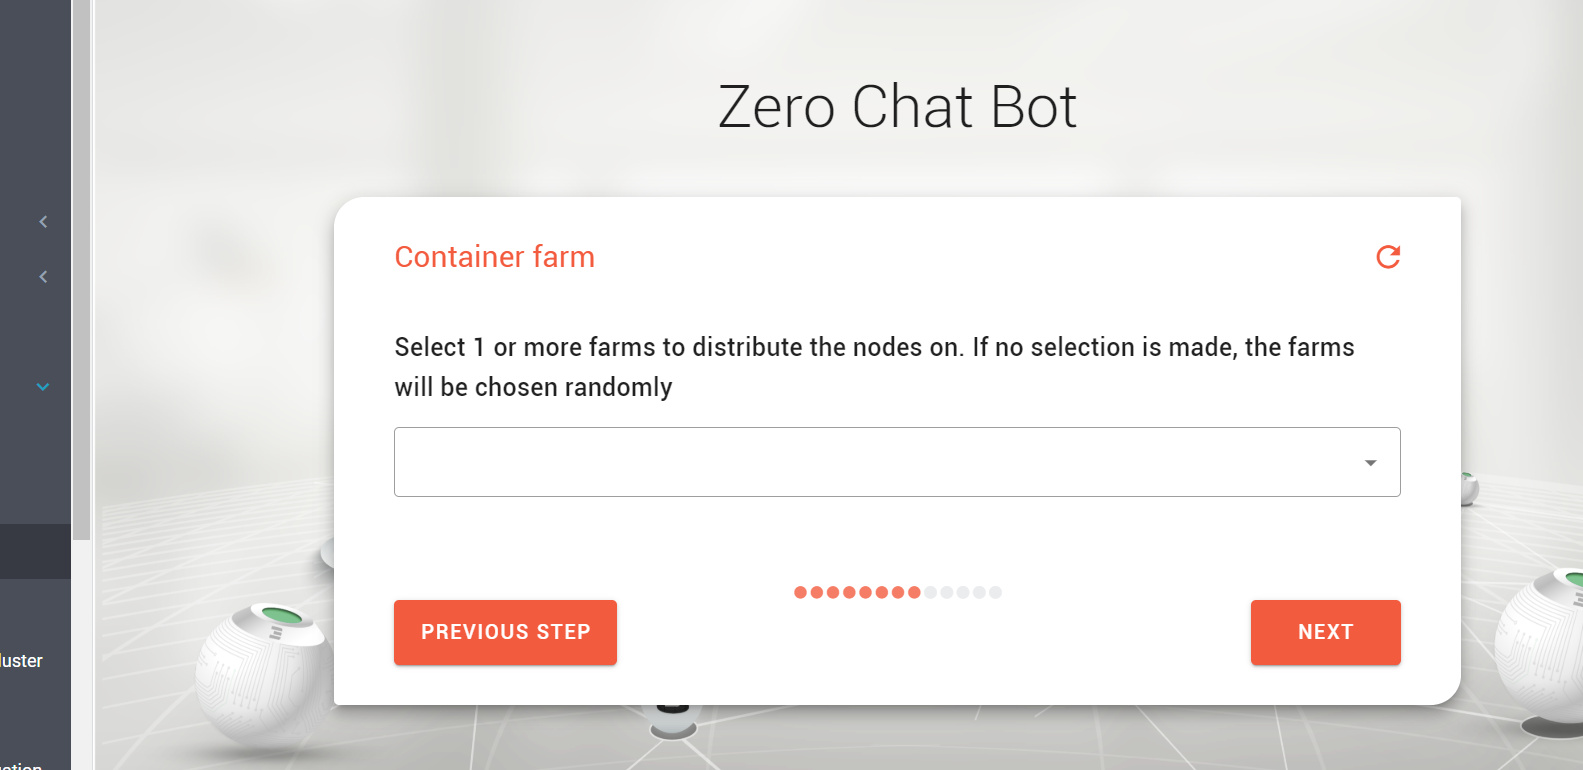
This is the location and the farm where your container would be deployed. It is better to select freefarm or leave it empty.
Select the expiration time and then choose the IP address of your container. This is what you will use to access the container,
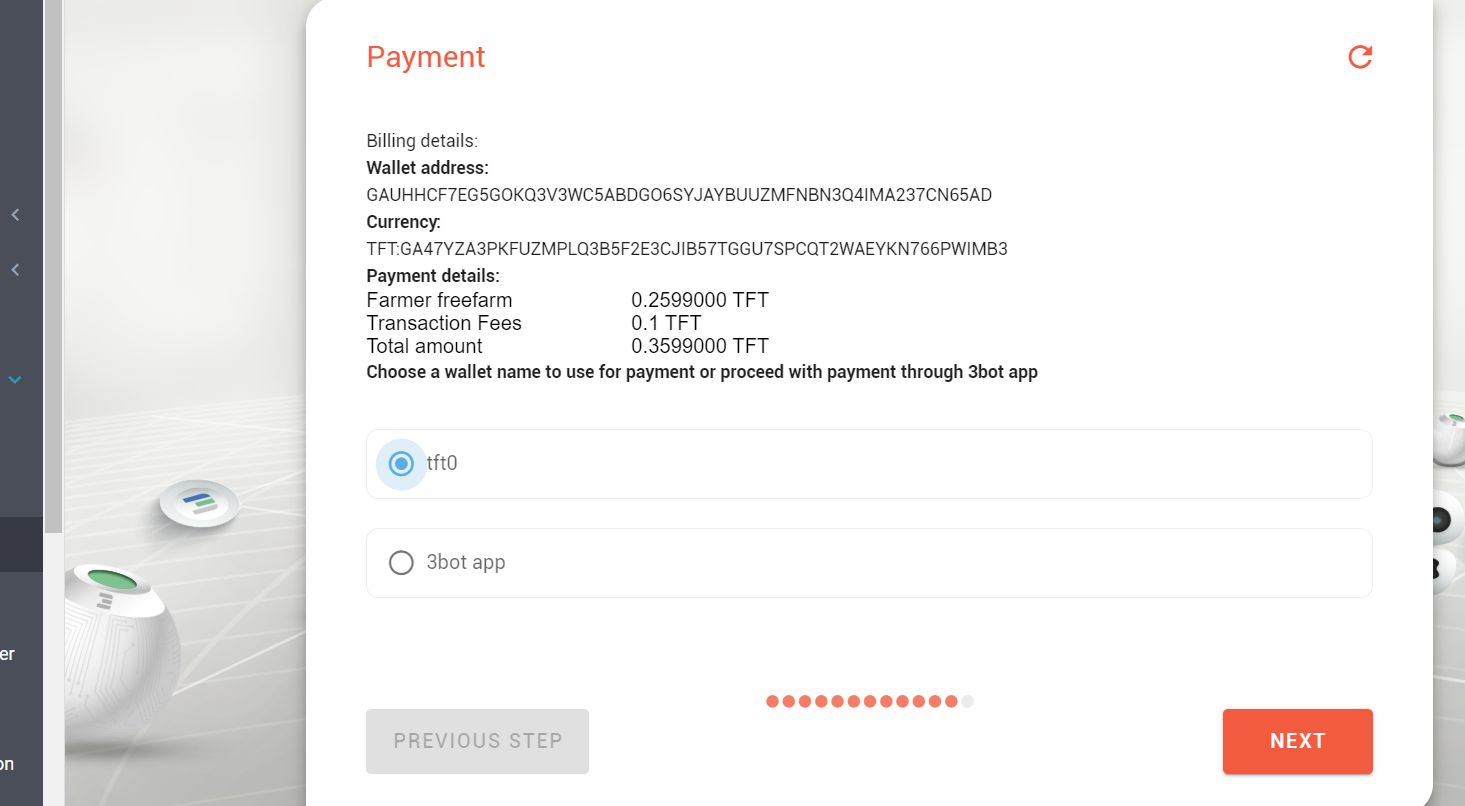
Before the actual deployment happens, you get a screen to review. If all looks good, just go ahead and click Next to pay,

Now you have the payment screen. You can pay using your wallet you created in Step 3 or even through the 3bot App moving forward. Just make sure you have tokens there. To buy tokens, look here
If all went well, this what you shoud see in the end 
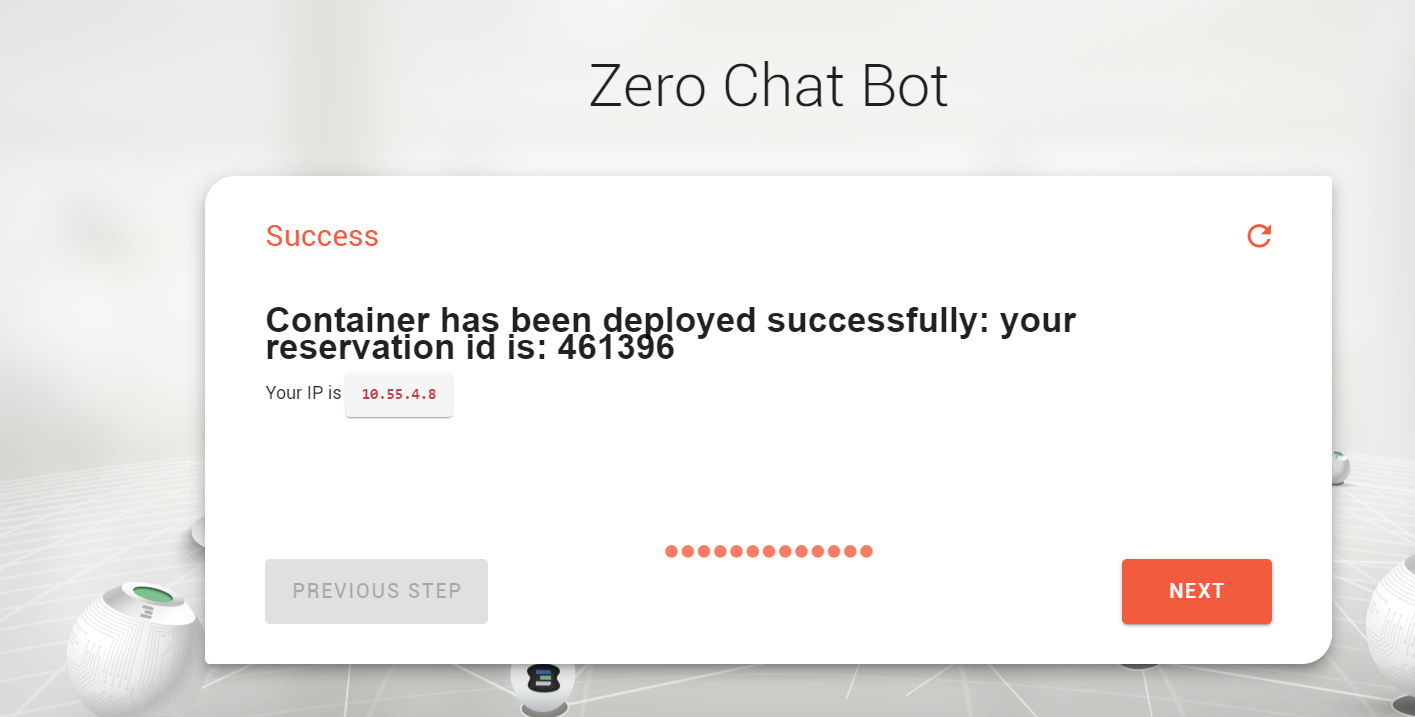
That should be it ! You will be given a reservation ID of your deployment that you can use for future references.
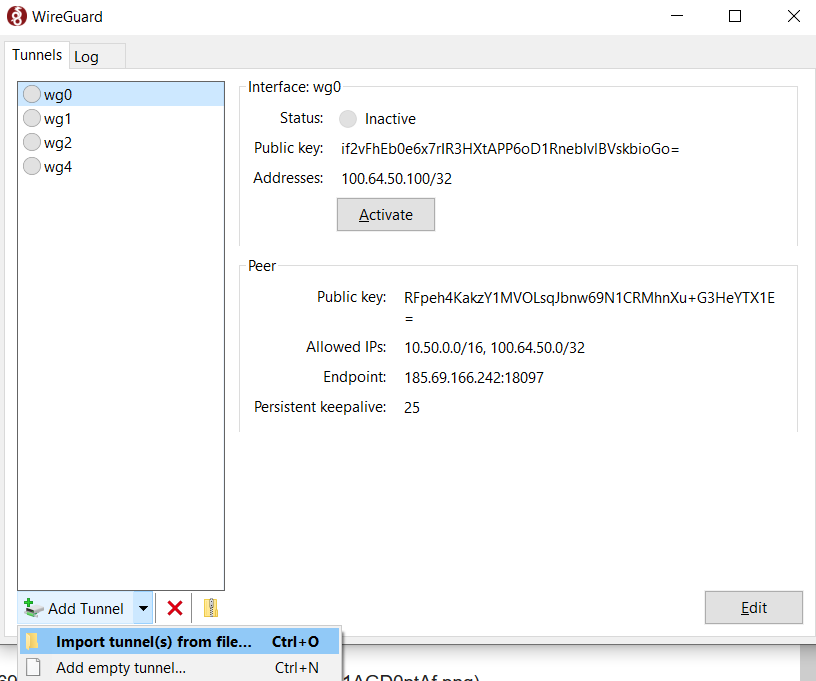
Step 5 - Access your Dash Container
To access the container,
For Linux , wg-quick up path_to_wireguard_conf_file. For example, wg-quick up /my-wg/net-1.conf
For windows , Import the downloaded wireguard configuration from Step 2,
Once the wireguard tunnel is up, you can test connectivity by doing a ping test for your container IP address. Access the container with ssh using your private key.
ssh -i path_to_your_privatekey root@container_ip_address, For example ssh -i /opt/mysshkey root@172.20.10.5
The SSH public key should be provisioned during the container deployment.
Step 6 - Verify your Dash Node Deployment
Click Generic flist again from the menu and you should see the name of your solution deployed.
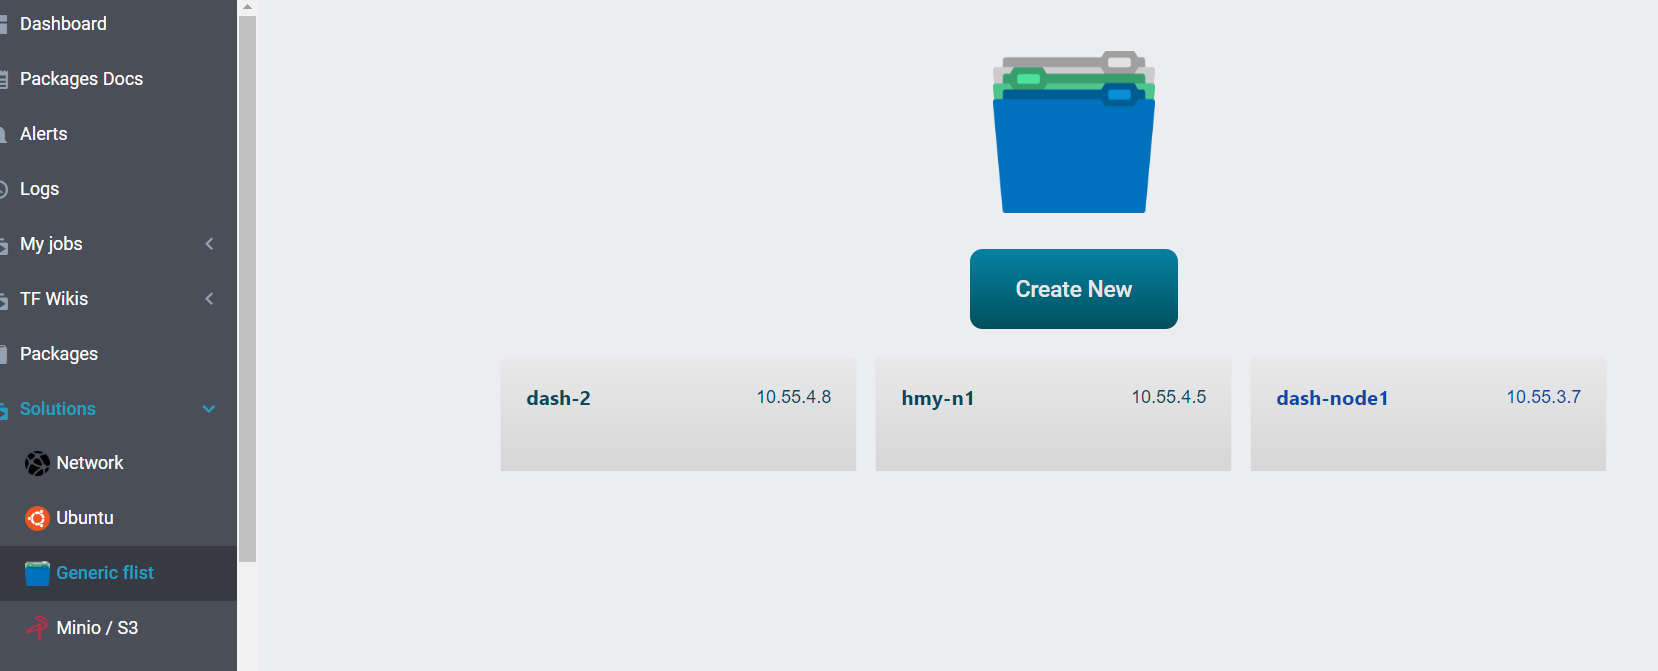
You can click it to see details of your deployment,

Now is the time to get under the hood
SSH into your container and do a ps aux. You should see dashd (dashcore) running.
root@zosv2tst-7:~# ps aux
USER       PID %CPU %MEM    VSZ   RSS TTY      STAT START   TIME COMMAND
root         1  0.0  0.0  72296   724 ?        Ss   09:01   0:00 /usr/sbin/sshd -D
root        10 92.4  5.7 2978608 948432 ?      Ssl  09:01  10:06 ./dashd
root        39  0.0  0.0 107980  4656 ?        Rs   09:02   0:00 sshd: root@pts/0
root        54  0.0  0.0  20252  1200 pts/0    Ss   09:02   0:00 -bash
The data directoty is /dash-data. You will see the dash daemon dumping data here,
root@zosv2tst-7:/dash-data# tree -dh
.
├── [  54]  backups
├── [1.2K]  blocks
│   └── [4.5K]  index
├── [ 792]  chainstate
├── [  56]  database
├── [  72]  evodb
└── [  72]  llmq

7 directories
You can see the logs here by doing a root@zosv2tst-7:/dash-data# tail -f debug.log in the dash directory. Make sure you run this in a tmux .
2020-06-11 09:23:19 UpdateTip: new best=00000000000000376dcd97fcbc8ade63f18164d5bc2ed296173572e353aab95a height=929184 version=0x20000004 log2_work=75.34653964 tx=7889004 date='2018-08-30 18:23:53' progress=0.343223 cache=244.7MiB(1771252txo) evodb_cache=0.0MiB
2020-06-11 09:23:19 UpdateTip: new best=0000000000000026d6a9b4dcce35f7741162257cbd1d70ca3a5475238b0819fb height=929185 version=0x20000004 log2_work=75.34654650 tx=7889011 date='2018-08-30 18:25:45' progress=0.343223 cache=244.7MiB(1771250txo) evodb_cache=0.0MiB
2020-06-11 09:23:19 UpdateTip: new best=00000000000000477024073c1a7682901583608d379cc5bc6e7f165f4f15e5fc height=929186 version=0x20000004 log2_work=75.34655338 tx=7889025 date='2018-08-30 18:29:09' progress=0.343224 cache=244.7MiB(1771265txo) evodb_cache=0.0MiB
2020-06-11 09:23:19 UpdateTip: new best=0000000000000036cd36e5b95001ce402528f29d9302c161d6f746efdac67f20 height=929187 version=0x20000004 log2_work=75.34656002 tx=7889044 date='2018-08-30 18:32:11' progress=0.343225 cache=244.7MiB(1771268txo) evodb_cache=0.0MiB
2020-06-11 09:23:19 UpdateTip: new best=0000000000000043d4cd0adefb1dd5d931641128cf0847505cb133a7d5fa7135 height=929188 version=0x20000000 log2_work=75.34656667 tx=7889046 date='2018-08-30 18:32:17' progress=0.343225 cache=244.7MiB(1771271txo) evodb_cache=0.0MiB
2020-06-11 09:23:19 UpdateTip: new best=000000000000001086bcf24743b7cce6737850553216324828e4b5fb3e27e128 height=929189 version=0x20000004 log2_work=75.34657337 tx=7889051 date='2018-08-30 18:33:25' progress=0.343225 cache=244.7MiB(1771274txo) evodb_cache=0.0MiB
2020-06-11 09:23:19 UpdateTip: new best=0000000000000033a7216d7ed41f5adbaea3e411fc882f5ccf02546b796332a6 height=929190 version=0x20000004 log2_work=75.34658023 tx=7889068 date='2018-08-30 18:38:23' progress=0.343226 cache=244.7MiB(1771286txo) evodb_cache=0.0MiB
2020-06-11 09:23:19 UpdateTip: new best=00000000000000348c74452ba2bbddf00b5635d204df5a09135450ce2e3f7b0c height=929191 version=0x20000004 log2_work=75.34658698 tx=7889073 date='2018-08-30 18:38:55' progress=0.343226 cache=244.7MiB(1771288txo) evodb_cache=0.0MiB
2020-06-11 09:23:19 ProcessNewBlock : ACCEPTED
2020-06-11 09:23:19 ProcessNewBlock : ACCEPTED
2020-06-11 09:23:19 ProcessNewBlock : ACCEPTED
2020-06-11 09:23:19 ProcessNewBlock : ACCEPTED
2020-06-11 09:23:19 ProcessNewBlock : ACCEPTED
2020-06-11 09:23:19 ProcessNewBlock : ACCEPTED
2020-06-11 09:23:19 ProcessNewBlock : ACCEPTED
2020-06-11 09:23:19 ProcessNewBlock : ACCEPTED
2020-06-11 09:23:19 UpdateTip: new best=00000000000000121c32f6d14352ba37207cee2aca4c1e6a7e865207bf3bb5ec height=929192 version=0x20000000 log2_work=75.34659377 tx=7889090 date='2018-08-30 18:42:45' progress=0.343227 cache=244.7MiB(1771304txo) evodb_cache=0.0MiB
Dash Node sync is in progress and you could do a watch 'du -hs /dash-data' and you’ll see the data directory growing as it syncs new blocks,
Every 2.0s: du -hs /dash-data                                                                                                                                                  zosv2tst-7: Thu Jun 11 09:27:00 2020
10G     /dash-data
You can mount this with a persistent volume too.
That should be pretty much ! . We have a Dash Full Node running. Once the node syncs, you can update keys / wallets as per your requirements. This should get you started !
Note : To be a Master Node, you need to fund 1000 Dash. This is a full node
Sources:
Dash documentation is pretty updated.
https://docs.dash.org/en/stable/masternodes/